How to Use NordVPN (2026): Setup on Windows, Mac and Linux, Plus the Settings to Check First
To use NordVPN, install the app for your computer, sign in with your Nord Account, and press Quick Connect, or pick a country from the list. That is enough to put your traffic through NordVPN's encrypted tunnel. What most guides skip is the next five minutes: several settings that change how well you are protected, such as the kill switch and post-quantum encryption, are things you switch on yourself. This guide covers installation on Windows, macOS and Linux, your first connection, and the settings to check before you rely on it.
It is written for people setting NordVPN up on a computer. Phones get only a short note, because the steps there are mostly tapping through the app store. Still choosing a provider? Start with our general VPN setup guide instead.
Install and sign in
Windows
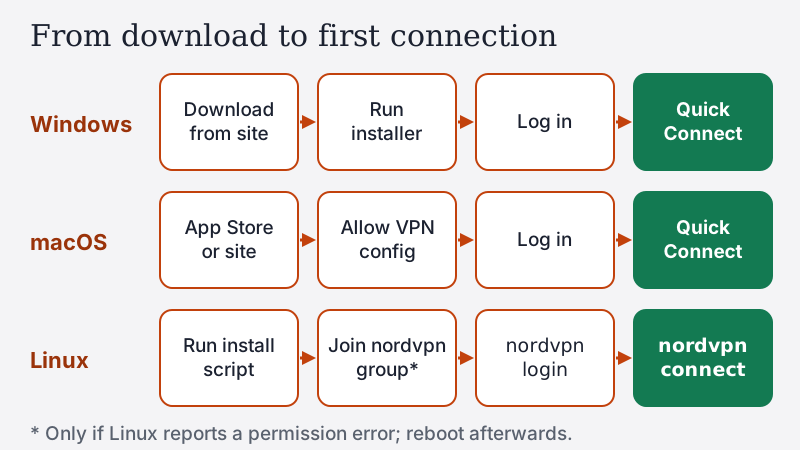
- Download the Windows app from NordVPN's website and run the installer, accepting the Windows permission prompts.
- Open NordVPN and choose Log in. Sign in with the email and password of your Nord Account (the account you created when you subscribed).
- Press Quick Connect, or search for a country. The app shows your new location once the tunnel is up.
macOS
NordVPN publishes two Mac versions: one from the Mac App Store and one downloaded from its website. Its support pages describe them separately because their kill-switch features differ (more on that below). Either works for everyday use.
- Install the version you prefer and open it.
- On the first connection, macOS shows a prompt asking permission for the app to add VPN configurations. Allow it; without that approval the app cannot create a tunnel.
- Sign in and press Quick Connect or choose a country.
Our Mac setup guide explains the macOS prompts in more detail if any of them look alarming.
Linux
NordVPN's Linux app comes as a command-line client with an optional graphical app. NordVPN lists support for Ubuntu 22.04 and later, Debian 12 and later, Fedora 43 and later, Linux Mint 21 and later, and Raspberry Pi OS, with .deb and .rpm packages and a Snap. Its support article gives these commands:
- Install the CLI: `sh <(curl -sSf https://downloads.nordcdn.com/apps/linux/install.sh)` (or the same script with `-p nordvpn-gui` to add the graphical app).
- If you see "Permission denied accessing /run/nordvpn/nordvpnd.sock", run `sudo usermod -aG nordvpn $USER` and reboot.
- Sign in with `nordvpn login`, then connect with `nordvpn connect`. Add a country to choose where: NordVPN's own help text gives `nordvpn connect Australia` as the example.
The Linux client is open source under the GPL-3.0 licence on GitHub, which is unusual among the big providers and handy if you want to see exactly what a setting does. Our Linux setup guide covers the general Linux VPN options.
First connection: Quick Connect or choose a country
Quick Connect lets the app choose a server for you, and for everyday browsing that is the right button. Choose a country yourself when you have a reason: you are travelling and want your home country's services, or a site is behaving oddly on the server you landed on. Our guide to changing your VPN location covers what to do when a site still shows your real location after you switch.
Once connected, do a two-minute check rather than trusting the green status. Visit an IP-lookup site and confirm it shows the VPN's country, then run a DNS leak test and make sure the resolvers listed belong to NordVPN rather than your internet provider. This is the same verification step we recommend after setting up any VPN, in our how to use a VPN guide.
The settings to check: where each one lives
Do not assume how a fresh install is configured. NordVPN's apps change between versions and differ by platform, so open Settings once and set each of the options below deliberately. NordVPN's own instructions for post-quantum encryption, for instance, tell you to switch it on yourself on every platform.
| Setting | Windows | macOS | Linux CLI | What we suggest |
|---|---|---|---|---|
| Kill switch | Internet Kill Switch and App Kill Switch in Settings | App Store version: VPN bypass prevention; website version: App Kill Switch | nordvpn set killswitch on | On (Internet Kill Switch on Windows) |
| Auto-connect | Settings › Connection and security › Auto-connect › On all networks | Settings › Auto-connect toggle | nordvpn set autoconnect on | On, with your home network trusted if you prefer |
| Post-quantum encryption | Settings › Connections › Post-quantum encryption | Settings › General › Post-quantum encryption | nordvpn set pq on | On, unless you need a dedicated IP or Meshnet |
| Protocol | NordLynx, or NordWhisper on restrictive networks | NordLynx, or NordWhisper on restrictive networks | nordvpn set technology NORDWHISPER (when needed) | NordLynx day to day |
| Real-time protection (formerly Threat Protection) | Protection (shield) section of the app, on plans that include it | Shield icon › set up and allow the extension | nordvpn set protection on | Optional; check your plan |
Five settings to change on day one
1. Turn on the kill switch
A kill switch blocks internet traffic when the VPN drops, so your real IP address does not leak during a reconnect. NordVPN's versions differ by platform. On Windows there are two: the Internet Kill Switch, which NordVPN says "cuts off your internet connection when disconnected from NordVPN servers", and the App Kill Switch, which closes programs you choose if the VPN drops. The Mac App Store version has "VPN bypass prevention", which NordVPN describes as working at the network level and staying effective across app restarts and sleep. On Linux, `nordvpn set killswitch on` blocks system-wide internet access if the VPN drops or you disconnect manually.
That last point is worth remembering: with the Linux kill switch on, disconnecting leaves you offline until you reconnect or run `nordvpn set killswitch off`. Our kill switch guide explains how to test that yours works.
2. Set auto-connect
Auto-connect closes the most common gap, forgetting to turn the VPN on. On Windows, NordVPN's support article says to open Settings, Connection and security, and choose "On all networks" in the Auto-connect drop-down; the app then connects you to the recommended country unless you set another. On a Mac it is a single Auto-connect toggle. On Linux it is `nordvpn set autoconnect on`, which picks the fastest available server unless you name one. You can list trusted networks, such as your home Wi-Fi, where it should not connect automatically.
3. Switch on post-quantum encryption
Post-quantum encryption protects today's traffic against a future in which quantum computers can break current key exchange. NordVPN lists seven platforms for it (the three desktop systems plus Android, iOS, tvOS and Android TV), says it "works with the NordLynx protocol only", and that it is incompatible with Meshnet and disabled on obfuscated servers. You also have to switch it off before connecting to a dedicated IP. If none of those apply to you, turn it on: Windows, Settings, Connections; Mac, Settings, General; Linux, `nordvpn set pq on`.
4. Choose the protocol on purpose
NordVPN's apps offer NordLynx (its WireGuard-based protocol), OpenVPN and NordWhisper. NordVPN recommends NordLynx, and it is the one post-quantum encryption needs. NordWhisper is NordVPN's protocol "designed to overcome restrictive local network environments", which in practice means office, campus and filtered public Wi-Fi. It is available on Windows, macOS, Linux, iOS and Android, but not with Dedicated IP, Meshnet or Onion Over VPN servers. Switch to it only when NordLynx will not connect on a particular network.
5. Decide on Real-time protection
NordVPN sells malware and tracker blocking alongside the VPN; current apps call it Real-time protection (formerly Threat Protection). On macOS, its support article walks through setting it up from the shield icon: you click Turn on protection (or Set up on first launch) and approve a system extension, configurations and disk access. What you get varies by plan and app version: on a Mac, NordVPN says its next-generation antivirus needs the version downloaded from its website, and that a Basic subscription is enough for it. On Linux it is enabled with `nordvpn set protection on`. It is useful, but it is not part of what makes the VPN work, so treat it as optional.
Specialty servers: Double VPN, Onion and obfuscated
Beyond standard servers, NordVPN offers several server types for particular jobs. Double VPN routes your traffic through two servers. Onion Over VPN sends it into the Tor network after the VPN. Obfuscated servers are meant for networks that block VPNs; NordVPN says this category now runs on the NordWhisper protocol rather than OpenVPN, so you can no longer reach obfuscated servers through a manual OpenVPN setup. A Dedicated IP is a paid add-on that gives you an address no one else uses. There is no separate P2P category: NordVPN says file sharing is supported on its standard servers.
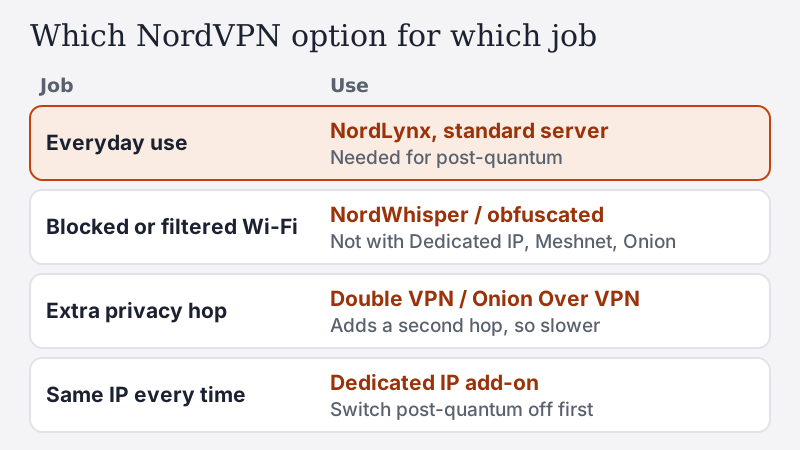
None of these is faster than a standard server, and some are noticeably slower because they add a hop. Use them when you need what they do, then switch back.
Troubleshooting
- Linux "Permission denied" on the socket. Add your user to the nordvpn group (`sudo usermod -aG nordvpn $USER`) and reboot, as NordVPN's install article says.
- Will not connect on work, school or hotel Wi-Fi. The network is probably filtering VPN traffic. Try NordWhisper; if that fails too, it is the network, not your setup. Our connection fixes checklist covers the wider diagnosis.
- Error when using Meshnet or a dedicated IP. Post-quantum encryption is incompatible with Meshnet and must be off for a dedicated IP. Turn it off for that session.
- No internet after disconnecting. That is the kill switch working, most noticeably on Linux, where it also blocks after a manual disconnect. Reconnect, or switch the kill switch off.
- IPv6 on Linux. Since release 4.0.0, NordVPN's Linux app has had IPv6 support on hold because of WebRTC leak concerns, and the old `nordvpn set ipv6` command is gone. Guides that tell you to use it are out of date.
- Interfaces on Linux. If you bind an app to the VPN interface, NordVPN's source names them `nordlynx` (NordLynx) and `nordtun` (OpenVPN).
Before you buy, or before it renews
Check the renewal price, not just the first-term deal. In October 2026 NordVPN's US renewal table listed Basic at $139.08 per year and Complete at $219.48 per year, before tax. The whole term is charged upfront, with sales tax on top. The first-term deal is the number that changes most, and it is set per country; the checkout page shows the one that applies to you.
The 30-day refund promise covers your first purchase only; once a subscription renews, NordVPN says it is "no longer eligible for a refund". New customers in listed countries, the US among them, can take a 7-day free trial on selected one- and two-year plans (a card or PayPal is required), and Google Play gives first-time Android users a 3-day trial of their own. We found no iPhone trial in NordVPN's support pages. For privacy, outside auditors have reviewed NordVPN's no-logs policy six times; the most recent, a Deloitte assurance engagement, covered 10 November to 12 December 2025, with the result made public in February 2026.
If that suits you, you can get NordVPN here (affiliate link; see our affiliate disclosure). If you would rather start free, our general setup guide explains Proton VPN's free tier.
Edge cases worth knowing
- Phones. Install from the App Store or Google Play and the settings above live under Profile, then Settings. Android's own Always-on VPN switch (Android 7.0 and later) adds a system-level safety net; see our Android guide.
- China. NordVPN's own China help articles describe its iOS, Android, macOS and Linux apps as "fully blocked in China". Do not plan a trip around it working there.
- Port forwarding. Not available. NordVPN explains that incoming connections cannot be routed to you, since many customers use each server at once.
- App Store purchases. If you subscribed through Apple, refunds go through Apple, not NordVPN; Google Play purchases can be refunded by NordVPN's support under its policy.
- Split tunnelling. Apps you exclude bypass the tunnel, and the kill switch may not cover them. Our split tunnelling guide covers the trade-off.
Bottom line
Using NordVPN takes three steps: install, sign in, connect. Using it well takes five more minutes in Settings: turn on the kill switch, set auto-connect, enable post-quantum encryption where your setup allows it, keep NordLynx as your protocol with NordWhisper in reserve for restrictive networks, and decide whether you want the threat-protection extras. Then check your IP and DNS once, and you can stop thinking about it.
Using NordVPN: frequently asked questions
How do I use NordVPN for the first time?
Does NordVPN turn on the kill switch automatically?
How do I use NordVPN on Linux?
Which NordVPN protocol should I use?
Does NordVPN have a free trial?
New to this? Start with how to set up a VPN, or read how to use a VPN day to day.